Wednesday, March 23, 2022

Project Quilting Season 13 roundup

 I enjoyed participating in Project Quilting again this year, and I completed entries for all 6 challenges.  I added rules for myself-- I wanted to use up scraps as much as possible.  And I wanted to avoid purchasing new fabric, in keeping with my sewing room clean and declutter process.

Challenge 1:  All the Colors

I made a table runner and a set of 4 placemats using all scraps. I used heat resistant insulbrite as batting-- gifted to me from a Buy Nothing Neighbor.  Quilting is walking foot straight lines using a rainbow variegated thread.  The backing is a batik that I've had in my stash for probably close to 30 years, so it's definitely time to use it up.


Challenge 2: Silhouette

My sister gifted me with a vinyl transfer she created on her cricuit.  Anyone who's seen what a house with two English labs looks like knows why she gave it to us.  Here's what I made.


The scrappy border is all from my tiny bits scrap bin. I free motion quilted in matching colors and the straight line quilting highlighting the silhouette is again that variegated rainbow thread.  I have a wall of dog memorabilia and photos where I plan to hang this.  Or I may turn it into a a throw pillow.

Challenge 3:  Kitchen related.

Well, this is what my kitchen looked like that week:


Yeah.  We're in the first stages of a complete remodel.  But using the colors we selected for our new kitchen as inspiration, and addressing an unmet need, I created this unique thing:  


I call it a duck egg skelter parking lot mat.  I have a small flock of back yard ducks who reliably lay about 100 eggs a month between them.  Best practices for home egg production is to keep eggs unwashed on one's counter in order of production -- hence the use of the skelter (so we use the oldest eggs first). Unwashed duck eggs sometimes look as if those ducks have been playing soccer with them, so isolating the grubbiness from other counter-top functions in the kitchen appeals to me -- and that's why I made this duck egg parking lot mat.  The block pattern is the traditional Duck Track block, of course.

Challenge 4: Diamonds

I have an accuquilt die for making those pesky half rectangle triangle blocks which lend themselves to a diamond design.  I decided to use that die for this challenge, and recalling that it can get tricky to deal with right and wrong sides of fabric with this shape, I opted to use only solids from my scrap bins.  Turns out I have a lot of solids.  I cut more than enough to make a queen sized quilt and two pillow shams.  By Wednesday of challenge week I realized that completing the entire queen sized quilt top was too ambitious an undertaking, so I completed one sham in time for the challenge deadline, while still working on the quilt.  It took 2 weeks to complete the diamond quilt, with lots of free motion quilting and ruler quilting, plus some straight lines to mix things up.


With that pieced backing I finished off some awkward remnants that have been sitting in a drawer for years.


Challenge 6: Repetition and rhythm

Again I used an accuquilt die that I've had for a while but not used in any large project -- the Local Color die.  I had an idea of creating the effect of overlapping layers, and I think I achieved what I had in mind.  All the novelty print fabrics came from scrap bins.  I did used yardage for the solids and the black batik, but all from stash, so no new purchases.


And the final challenge, Number 6: Flying Geese 

As I cleared my sewing room of bins and bags, I found all the scraps from a quilt I completed last year.  The good thing about left overs is that you've already done the work of deciding that the fabrics work together.  So I decided on a 3 by 6 inch finished flying geese block and cut every piece that was large enough for this next project.  As luck would have it, I had enough for 99 Flying Geese units.


It made for a very autumnal feeling piece, and I used a pumpkin colored fabric I've had for at least 30 years as the backing.  If I can believe the bolt I had this fabric stored on, it cost $1.90 a yard (that was a super sale even 30 years ago).  I often find it difficult to come up with a quilting motif for flying geese blocks, but I like what I came up with for this piece.  I decided not to use rulers and just embrace the unevenness of free hand free motion quilting.  This quilt is probably destined to be a wall hanging-- sized right for behind a couch, so I put in a hanging rod pocket as I bound it. Scrappy binding helped whittle that scrap bin even more.

So that's it for Project Quilting Season 13.  Always a fun way to start the year.


Being all trendy and making a quilted coat

Key themes for me in  2022 have been using up scraps and completing unfinished objects.  I've really powered through quite a few quilts and smaller projects already this year, but there was one quilt that just wasn't making me feel excited to dive in and get it done.

It's this one.  

I call it Zen Presbyterian.  


I used a layer cake of Shibori II by Debbie Maddy for Moda together with a few pieces from her Machi collection, some similar fabrics from my stash and the "fish eye" grey fabric which was a super buy at a store-going-out-of-business sale.  I remember the sales lady commented that nobody ever wanted to buy those "fish eyes" since they made your eyes go squirrely -- not great sales technique I thought at the time, as I bought the remainder of the bolt.

My original idea was that I would make a queen sized quilt to be used in my AirBnB rental.  I used a very simple pattern, with the intent of practicing free motion ruler quilting skills.  

Even though it's a super simple design, I still messed it up, which you can see if you look closely at the gray stripe and triangles.  I was having a hard time with details at the time-- it was very shortly after Daniel's death that I pieced this top, so 2017 or maybe early 2018.  I was trying hard to get back to quilting, but it just felt like a chore, and I made lots of mistakes and had a hard time with sticking to anything. (Normal for a brain in grieving and loss mode.)  

Ironically, after a day of frustration sewing, ripping out seams and getting very aggravated when things that used to be easy for me were just incredibly confusing, a friend from my yoga class commented that I was such a "zen" person, so calm and even-keeled.  I had to laugh, because her perception was so at odds with my internal reality, and I told her that if I was zen, I was a zen Presbyterian.  Yeah.  That makes no sense, but that's what I said. I then told her about the very simple quilt I was struggling with, and how frustrated I had been just hours before class.  She commented that she just had to see my Zen Presbyterian quilt-- so that's how it got named. 

So trying to be as zen as I apparently appeared, I accepted the layout error as a design feature, and I got the completed top layered and basted. It then sat languishing for a few years.  The cats liked burrowing into it. I moved it from closet to closet. It showed up on to-do lists for several years.  And I kept feeling bad about not finishing it.  

This year as I sorted and purged my quilting room, I realized that my failure to finish this particular quilt was due to several things.  

1. I wasn't as zen about the mistakes in layout as I liked to think I was. I knew it was going to bug me every time I looked at this quilt. The more simple a design is, the more the mistakes show up.

2 .With more experience as an AirBnB host I realized a handcrafted quilt wasn't my best option (my guests value freshly laundered bedding more than unique quilts, and washing any quilt multiple times a week is excessive.) 

3. After a little experience with ruler quilting, I knew I wasn't going to enjoy manipulating such a big and heavy quilt on my domestic machine while using rulers. 

4. I've quilted two large quilts in the last two months, and the arthritis in my hands is annoying enough to make a third big quilt project unappealing.

I've seen the quilted jackets (and other garments) popping up on social media and I'm apparently subject to peer pressure just as much as the next person, so it occurred to me that a quilted jacket was a good way to re-purpose Zen Presbyterian (ZP).  When I saw the Ruby Pea Coat by 5 out of 4 Patterns, I knew it would be a good choice.  Pockets!  Hood! Relaxed fit but not shapeless!  And I know from experience that 5 out of 4 Patterns are always well drafted and have good instructions, even for people like me  who are not primarily garment stitchers.

Because my fabrics were not pre-washed and I know that my free motion quilting creates quite a bit of shrinkage, I sized up. I measured an XL, but I cut 3X.  Originally I planned to follow the lined jacket directions, and I separated the quilt, tearing out the small amount of quilting I had already done and setting the lining to one side, keeping the pieced top pinned to the batting. I cut out the major pieces using my projector, but also made a paper pattern (projected onto paper and traced that) because I was having a hard time figuring out a layout that would economize but also result in good pattern matching of the gray stripe feature.  I also tried to avoid quilt piecing seams along the edge of the coat pattern pieces because that would result in very bulky seams in the finished garment. I also eliminated the back seam and cut the jacket back as one piece to eliminate another seam.


After I cut out the coat, I cut the quilt backing as the lining.  At that point I realized that I preferred not to follow the pattern's instruction for the coat lining, and I cut the lining more as "side 2", just replicating the main coat pattern pieces.  From there I assembled the coat fronts and backs for both side one and side 2, and then stitched them together right sides facing, leaving the arm holes open and only using a long basting stitch along the neckline. Because my jacket's side 2 alleviated the need for a hem, I cut off the hem allowance and skipped making the facing called for in the pattern. 

After trimming all the batting in the seam allowance right to the stitching line and grading the seams, I turned the garment right sides out, pressed, added pockets to side 1, and then did the free motion quilting through all 3 layers, leaving a margin of a couple of inches around the neckline unquilted because I knew the hood was going to need to go there..  

I assembled the sleeves, side 1 and side 2 with batting in between and free motion quilted them while they were flat. Strips of flying geese blocks which were originally part of the quilt back were part of the sleeve cuff on side 2. When I assembled the sleeves I used inserted biding strips as suggested in the pattern to create a finished sleeve on side 2. As a quilter I'm used to hand stitching binding, so my binding strips are finished with an invisible slip stich by hand.

More of the flying geese blocks made it into the hood on side 1.  The hood was easy to assemble, and I pretty much followed the directions in the pattern.  I free motion quilted the hood when it was assembled, after the top stitching step (3-D free motion quilting--yeehaw!).  Attaching the hood to the jacket was easy -- I removed my basting stitches at the neck of the jacket, and stitched right sides together of side 1 jacket and side 1 hood.  Then I slip stitched by hand to attach side 2 hood and side 2 jacket.


Attaching the arms to the jacket was standard, except I used binding strips to cover the seams and create a finished sleeve on side 2.  Because the fabric is pretty distracting (thank you fish eye fabric), I find the join is not visible at all. 


I wanted both sides of my jacket to be equally functional, so I added pockets to side 2 using scraps and hand stitching the pockets.  If I really thought about it in advance, I probably could have figured out how to machine stitch both layers of pockets at the same time.  Or maybe not.  Hand stitching wasn't so bad.

For a fastening, the best option I could come up with that was truly reversible was snaps.  After trying on the jacket and thinking about how I will wear it, I opted to put the snaps lower than the pattern calls for.  

Luckily for me, a friend let me use her Kaz snap setter so I was able to add my snaps easily and with none of the drama I've experienced in the past using the old spool and hammer setting methods. (Thanks again, Cathy!) After playing with her cool Kaz, I started to think I may need my own snap setter.  I think snaps would start appearing many places around my house.  So much cleaner as a finish than velcro, and so much faster than buttons and button holes, or even zippers.

Things I would do differently next time:

  • I would cut the quilt top into manageable chunks and then layer the top, batting and backing and free motion quilt the pieces before cutting out the coat pieces.  I would then follow the directions for an unlayered jacket and would use binding (maybe matched bias binding) to cover my seams and serve as a hem.  That would have been an easier and more logical approach.  
  • I would make pockets without batting between the pieced surface and the lining.  If I wanted a little more body, I would put a layer of flannel in there in place of batting so that the quilting would have some texture but not so much bulk. As it is, with two layers of pockets in addition to the jacket itself, there's a lot of bulk.  I could use the pocket area of this jacket as oven mitts.
  • I would make the arms longer.  I did add 1" to the pattern length to make up for shrinkage from quilting, but that wasn't enough, so my sleeves are more like 3/4 sleeves on my ZP coat.  I'm fine with that, as it works in our PNW climate and my casual wardrobe.  

As many online commenters from the 5 out of 4  FB page pointed out, I could add cuffs or bands to lengthen the arms.  If I find that I don't enjoy the jacket because the arms are too short, I will in fact add quilted fabric bands. It wouldn't be all that hard, and I definitely have enough scraps left over.  We'll see.


Anyhow, there it is, at exhaustive length. How Zen Presbyterian became a Ruby Pea coat.  If you take away nothing else, read this as a history of figuring it out as you go along. If I knew exactly what I was doing from the first step, it would have been a faster project and the construction more straightforward.  But I actually enjoyed taking each step as it came and then working through how best to apply the process to the particular materials I was working with.  That's probably not exactly zen, but it's close enough for me.


Saturday, January 25, 2020

Flags for my Tribe A Project Quilting Challenge

This week's Project Quilting challenge was to use our "team colors."  As I'm not a team person, I side-stepped and went with tribal flags to celebrate and remember all the "Molehill" kids. 


Two things shaped my idea:

My friend Gwen at The Hartley Hooligans invited her online community to mark that sad/sweet event of a child's birthday after their death with artistic or creative renderings of her name -- Claire --  which we then shared on Instagram.  Of course my contribution  was threads and fabric.


Additionally, this week marked the 10 year anniversary of the death of little Rachel B., a dearly loved and sorely missed young lady who was known for her sunny smiles, her love of horses, her messy hand-prints. . .  Tying in to the idea of thread-painting a name with free motion quilting that Gwen inspired, I also used the Scattered Sunshine logo from the website Rachel's family created to facilitate access to horseback therapy for other special needs kids.


And from there, I was off and making 8 more flags to commemorate, celebrate, and remember all the kids of the molehill, both those who have died and those who are continuing to live their unique, amazing lives.


(Note-- yes, our group does have two Daniel's and two Rachel's (in addition to me).

Each flag has little motifs or color choice that reminds me of stories or memories that I associate with each of the kids.  The molehill kids have been a treasured part of my life for very close to 20 years now, and there is a treasure trove of memories to draw on.

What will I do with these flags?  I have plans.  The molehill moms hope/plan/intend to have our 2nd get-together this summer at my house.  Pulling off an event like this is incredibly challenging, considering all the care needs and logistics for travel for 8 moms who do more than the average to keep complicated households chugging along, but hoping that we will meet up in July of 2020, I've got the backyard decor ready to to.  It'll look great draped around the fire pit and swings.  Festive, but not as flammable, as say, sky lanterns (inside joke there).  After our shindig?  I constructed them so that they can easily be made into pillow, should the recipient prefer a throw pillow over a wall hanging.

Thanks for a fun challenge, Kim Lapacek.  I learned some things as I stitched like a mad woman to complete these for the deadline.  Normally I would be tempted to try out more complicated techniques.  As I was working, I considred trying out couching to make the names pop more.  Or I considered using the rental Cricut cutter at our library to make stencils or vinyl transfers which would result in more uniform and polished motifs.  While that impulse to try out more complicated things is not all bad, it does sometimes lead to unfinished, stalled, frustrating zip lock baggies of projects that got too complicated.  I'm glad the deadline kept me in check and on task.  And who knows, I may yet go back and add in some things -- like grommets for hanging, or gilding paste to highlight certain portions.

Saturday, January 18, 2020

2020 Roman Style


This month, I'm following Project Quilting, Season 11 hosted by Persimon Dreams on Instagram.    Project Quilting  The first prompt is "Notably Numeric." 


 We're to make a quilted thing, from start to finish between Jan 5 and Jan 12, somehow relating to the numeric theme.


My thought process ran like this:
 I've seen several people warning us all to fill in the date completely lest we be victimized by someone trying to backdate checks or other documents when we lazily just write " '20 ".  Image result for 2020 on checks

This made me consider if and how this very issue may have been a problem for people using Roman numerals (Romans and others in their Empire, for example).
Image result for roman empire with roman numerals

I then thought about how this year's MMXX is a particularly interesting date, Roman numerically speaking, and would translate to fun graphics.  Or quilt blocks.


Since I had lots of scraps on my work table floor, I just used the rough cut strips to play with making some roman numerals in fabric.  No precision happening here, and that shows up in points not matching perfectly and my numerals being different sizes.  I decided to make that a feature rather than a flaw because this is play time.

Once I had my roughly constructed numerals stitched, I decided that a hot pad would be the very thing to use them up.  Hot pads in my house are very utilitarian, and I expect them to wear out and be thrown away after a year or two, so they are a perfect place to use scraps and improvisation.

My hot pads have 2 layers of Warm and Natural batting and one layer of Insulbrite in addition to the pieced front and the solid back.

I use the faux binding technique as it's fast and easy and there is no hand stitching at all (see above about how hotpads are by no means heirloom quality at our house).  I like to do some detailed quilting with only the pieced top and one layer of batting, then construct all the layers, and add some minimal quilting through all the layers, just enough for structural integrity. 

So -- about 15 minutes of doodling while I was on hold scheduling a plumber and 2 hours of playing in the sewing room, and I'm done with week 1 of Project Quilting.

Saturday, August 1, 2015

The same, but different

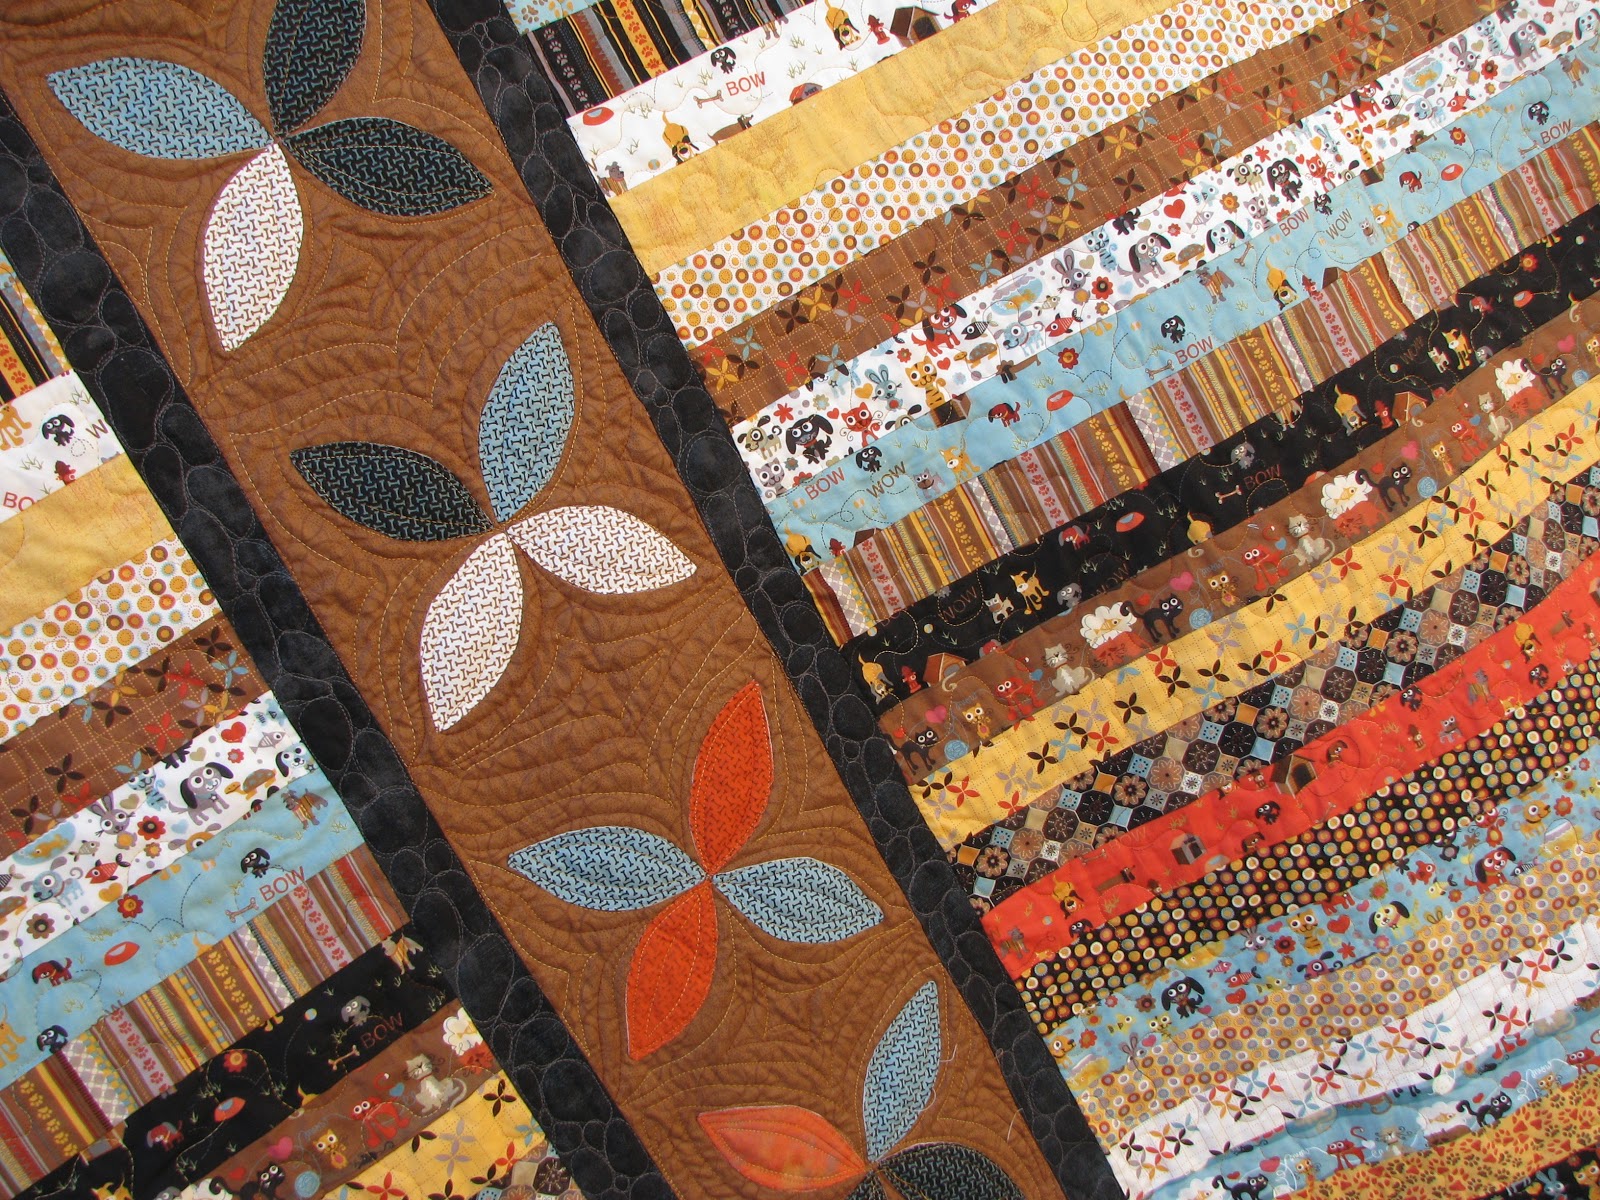
Take a look at these two quilts made using the same amount of fabric and the same basic techniques.


Both are made from a jelly roll ( pre-cut 2.5 inch strips of fabrics from a single manufacturer's line) so construction was fast and easy.  I arranged the strips on a design wall in an order that I liked, stitched them together, then sliced the finished piecing about 1/3 of the way in.  And no, I didn't measure - just eyeballed what looked about right and cut carefully with a long ruler.  The inset piece features some appliques using the same fabrics.  In the top quilt, Sunnyside, I happened to have a charm pack (5 inch squares) of the same line, so that worked well to make circle appliques.  The second quilt, which I call Furball, features a dog and cat motif in a Basic Grey line -- name escapes me at the moment.  With this one, I only had the jelly roll strips to work with, so I made orange peal appliques just the right size; the orange peal motif just happens to tie in with a repeated design in the fabric print.  With both quilts, I found that adding a thin border to outline the inset panel pulled the overall design together better.

Because the jelly roll strips translate to a very busy design, I just did a loose stipple on both quilts.  But in the applique panel area, I chose to do a more detailed, specific free motion quilting approach.  On the Sunnyside quilt, I did pebbling, which works well with the circles.

On the Furball quilt, I mostly echo quilted, which in turn created its own secondary pattern.


These finish as  large crib quilts, or a pretty standard lap or throw size.  No pattern -- you don't need one.